This post follows: Part 10: Creating the CameraRig Control Script
Unity supports several of input devices that simplify into mouse, joystick or keyboard behavior, it gets a bit challenging as the same input device will have varying input configurations across devices (PC, Mobile) and platforms (Windows 10, previous Windows, Linux, Mac, iOS, Android etc.)
There are several dual-stick/controllers available across platforms — unfortunately we are still not at the stage of having a single controller solution. I use the Xbox One Controller for PC and Xbox One, the NVidia Shield, Nexus and Fire Controllers over Bluetooth for Android Apps and when I get the time to test it out the SteelSeries Nimbus for iOS. The programming concept is very similar across the controllers, the key differences are with button and axis id assignments. I’ll be using the Xbox One controller as the development reference – might as well use the same controller platform that is included with the Oculus Rift package.
The Xbox One controller has slight changes in the button naming convention compared to the Xbox 360 version (which shares setup and usage conventions with other controllers since it has been out for quite some time.) The controller layout is the same but the Xbox 360 Back and Start buttons are now referred to as View and Menu buttons respectively.
There are several guides, blogs and sites that cover the Xbox 360 controller setup for Unity. The setup and programming concept remains the same, we have to be aware that the axis setup actually vary across platforms and in the case of Windows 10 vs. previous versions of Windows — we need to make sure that the axis assignments are updated as there is a difference in the configuration.
http://wiki.unity3d.com/index.php?title=Xbox360Controller
The Xbox One Controller is automatically recognized by Windows on a wired connection over USB or through a wireless connection using the Xbox Wireless Adapter for Windows
This is the setup I have for the Xbox One Controller on Windows 10:
(Updated November 25, 2016 to include return values and DPAD Axis Correction)
|
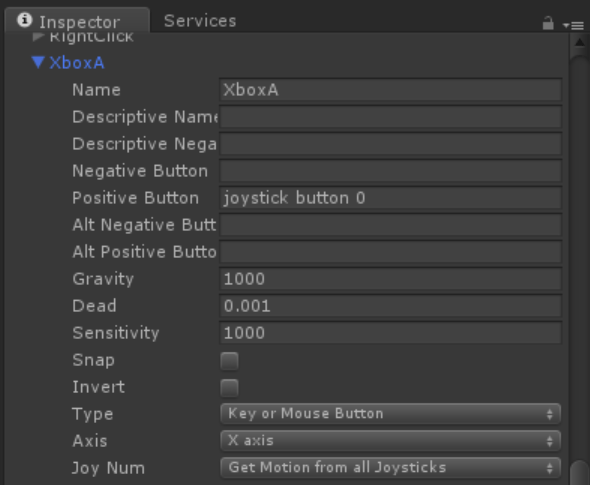
A |
joystick button 0 |
|
|
B |
joystick button 1 |
|
|
X |
joystick button 2 |
|
|
Y |
joystick button 3 |
|
|
Left Bumper |
joystick button 4 |
|
|
Right Bumper |
joystick button 5 |
|
|
View (Back) |
joystick button 6 |
|
|
Menu (Start) |
joystick button 7 |
|
|
Left Stick Button |
joystick button 8 |
|
|
Right Stick Button |
joystick button 9 |
|
|
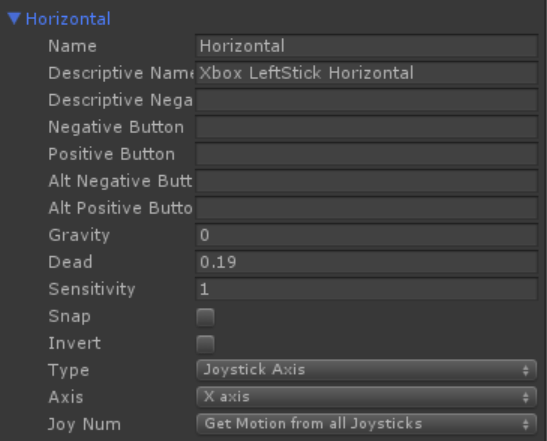
Left Stick “Horizontal” |
X Axis |
-1 to 1 |
|
Left Stick “Vertical” |
Y Axis |
1 to -1 |
|
Right Stick “HorizontalTurn” |
4th Axis |
-1 to 1 |
|
Right Stick “VerticalTurn” |
5th Axis |
1 to -1 |
|
DPAD – Horizontal |
6th Axis |
-1 (.64) 1 |
|
DPAD – Vertical |
7th Axis |
-1 (.64) 1 |
|
Left Trigger |
9th Axis |
0 to 1 |
|
Right Trigger |
10th Axis |
0 to 1 |
|
Left Trigger Shared Axis |
3rd Axis |
0 to 1 |
|
Right Trigger Shared Axis |
3rd Axis |
0 to -1 |
To use the controller, we go back to the InputManager — similar to the setup covered in Part 9: Configure Input Settings for Camera Controls
Make sure to use the configuration for Buttons and Joystick Axes for each corresponding entry. There are 10 buttons and 8 axes to configure.
Button Configuration
Joystick Axis Setup
We’ll be using “Horizontal”, “Vertical”, “HorizontalTurn”, “VerticalTurn” as the entry names to match the pre-existing keyboard setup for the Left and Right Sticks.
After completing the InputManager to include the Xbox One Controller setup, running the scene should automatically work with the controller since we are using the same input names for the dual sticks.
To aid in testing our setup, create another text object in the canvas to display the controller status.
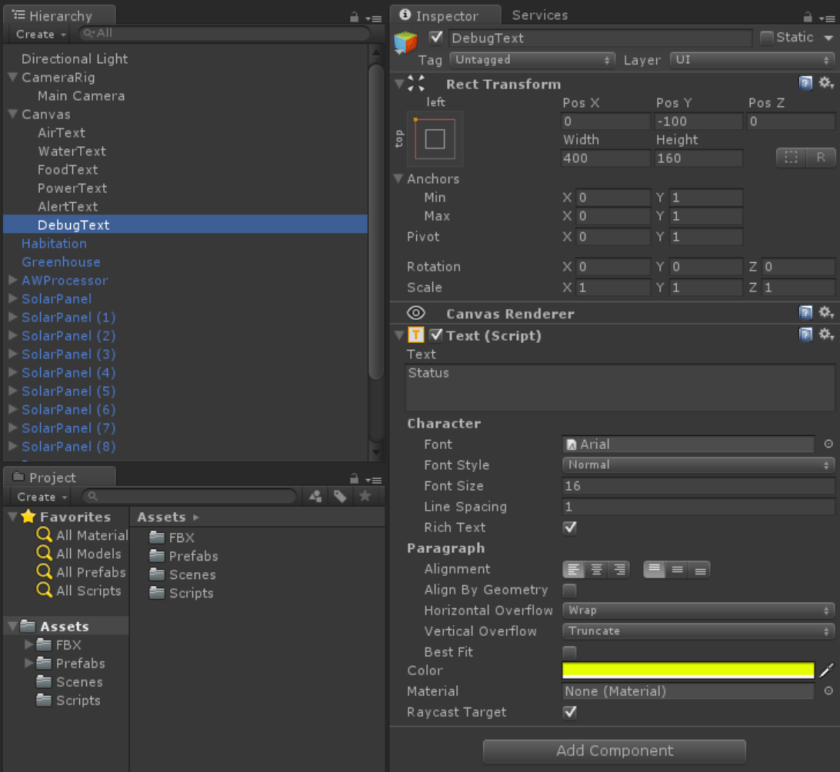
Edit CameraRig.cs, add a public UnityEngine.UI.Text entry “DebugText” so we can access the new Text object on the Canvas, Uncheck the “Raycast Target” so it does not block the Gaze. Include the following method in the CameraRig.cs script and call it from the Update() method, this will display the status of the controller buttons and axes at runtime.
    void ControllerCheck()
    {
        float ltaxis = Input.GetAxis("XboxLeftTrigger");
        float rtaxis = Input.GetAxis("XboxRightTrigger");
        float dhaxis = Input.GetAxis("XboxDpadHorizontal");
        float dvaxis = Input.GetAxis("XboxDpadVertical");

        bool xbox_a = Input.GetButton("XboxA");
        bool xbox_b = Input.GetButton("XboxB");
        bool xbox_x = Input.GetButton("XboxX");
        bool xbox_y = Input.GetButton("XboxY");
        bool xbox_lb = Input.GetButton("XboxLB");
        bool xbox_rb = Input.GetButton("XboxRB");
        bool xbox_ls = Input.GetButton("XboxLS");
        bool xbox_rs = Input.GetButton("XboxRS");
        bool xbox_view = Input.GetButton("XboxView");
        bool xbox_menu = Input.GetButton("XboxMenu");

        DebugText.text =
            string.Format(
                "Horizontal: {14:0.000} Vertical: {15:0.000}\n" +
                "HorizontalTurn: {16:0.000} VerticalTurn: {17:0.000}\n" +
                "LTrigger: {0:0.000} RTrigger: {1:0.000}\n" +
                "A: {2} B: {3} X: {4} Y:{5}\n" +
                "LB: {6} RB: {7} LS: {8} RS:{9}\n" +
                "View: {10} Menu: {11}\n" +
                "Dpad-H: {12:0.000} Dpad-V: {13:0.000}\n",
                ltaxis, rtaxis,
                xbox_a, xbox_b, xbox_x, xbox_y,
                xbox_lb, xbox_rb, xbox_ls, xbox_rs,
                xbox_view, xbox_menu,
                dhaxis, dvaxis,
                hAxis, vAxis,
                htAxis, vtAxis);
    }

    void Update()
    {
        // Camera Rig Movement Control
        hAxis = Input.GetAxis("Horizontal");
        vAxis = Input.GetAxis("Vertical");
        aAxis = Input.GetAxis("Altitude");
        htAxis = Input.GetAxis("HorizontalTurn");
        vtAxis = Input.GetAxis("VerticalTurn");

        ControllerCheck();

        ...
        ...
    }
Controller Testing
For questions, comments or contact – follow me on Twitter @rlozada
Follow @rlozada
You must be logged in to post a comment.