An interesting recent technological development is the self-driving car: a staple in science fiction and now a vehicle option. One of the components needed to create this modern technological achievement is the processing of large amounts of image data to create a computer vision model for recognizing objects that an autonomous vehicle encounters during operation. The initial stage of development involves capturing camera video and sensor data, which then goes through the process of labeling, usually by humans in a manual effort, to define what is in the image and create the training set.
To create an object detection feature for the autonomous control system of a vehicle, the training set is defined from the camera feed. Setting up a car with a camera and sensors to eventually drive around and validate the function is not something readily time- and cost-effective for an individual developer or small exploratory team; neither is generating and manually labeling large amounts of image data. In a recent team project, going through thousands of images of cars to create a simple classifier (a model that evaluates whether an object is present on the image) was tough and would only become more challenging when scaling up to process a few hundred thousand images. We would also need a means to test the trained model and consider an end-to-end process involving training data, testing, and refinement.
The Solution
A solution was devised to create a virtual environment that contains objects we would need to identify, as well as a means for movement, to generate different viewpoints simulating the world around a vehicle. Since a virtual environment is artificially created through code and tools, ground truth data is programmatically generated by aiming the world scene camera to a specific object and directly labeling without the need for human intervention. The same process is applied to test case generation and later provides free camera movement around the scene for model verification. Unity3D is the platform we used to create the virtual environment, which targets multiple operating systems from desktops and mobile personal computers to virtual and mixed reality headsets.
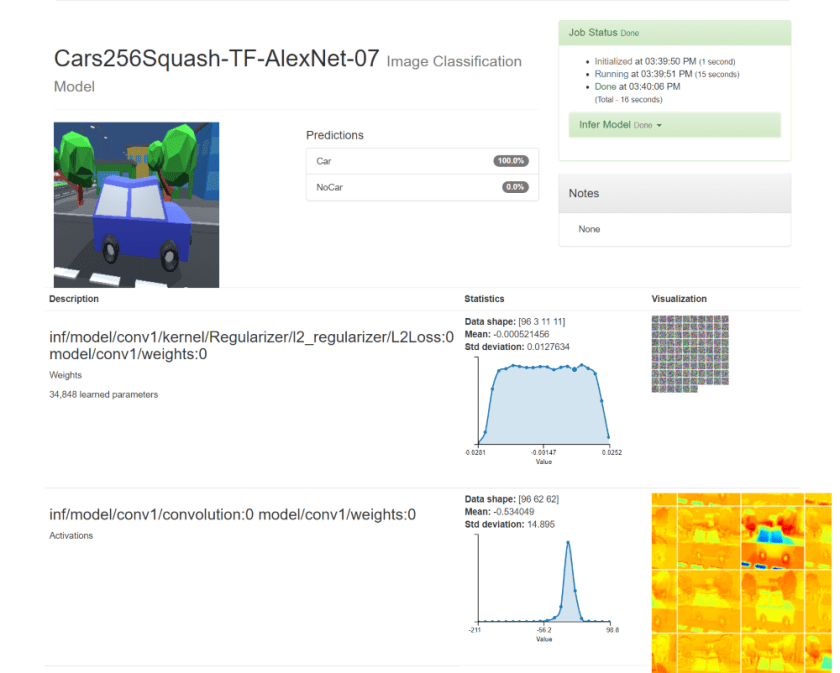
The main server setup for model training using the generated training set involves several GPU servers configured with TensorFlow in a distributed environment. To perform a quick validation, an Azure NC-series GPU server is configured with NVIDIA DIGITS (Deep Learning GPU Training System) to utilize pre-built tools and visualizers for pre-processing training data, model performance, and inference evaluation. The DIGITS server produces a trained model to serve as the baseline for results in comparison to our larger multi-server configuration. The “Hello, World” equivalent is to create a classifier model that will indicate the probability that our “Car” object is present in the evaluated image.
System Setup Requirements
- Microsoft Azure Subscription
- Ubuntu 16.04 on Azure Deployment (NC-series virtual machine)
- Port-forwarding from SSH session to server
- Understanding of Docker containers
- Set up and basic understanding of Unity3D (2017.2.0f3 used here)
Configure the Unity3D Project
The Unity3D platform is available in multiple editions; either for free (with some limitations) or with a monthly subscription cost. In the following setup discussion, it is assumed that Unity3D environment is configured on the development workstation with Unity Asset Store Access.
Clone the Unity3D Sample project.
https://github.com/ritchielozada/AutonomousControlSystemDevelopment
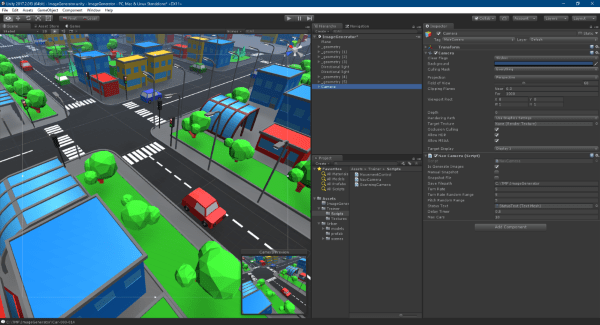
Open the /Unity3D/ImageGenerator project. The sample project contains an “ImageGenerator” scene that defines a camera with a control script that will move the camera around a target “Car” and create rendered single-image frames.
The project uses the free Unity asset Simple City – Low Poly Assets by Mixaill.
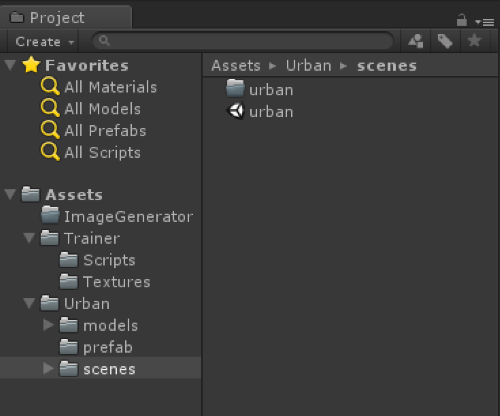
Import the free asset in the Unity project and look for the sample “urban” scene located in “Urban/scenes.”
Note: There are multiple alternative assets available, including photo-realistic versions, for a fee on the Unity Asset Store.
Load the “ImageGenerator” scene from the sample project. Missing components should now be listed with assets from the “Simple City” package.

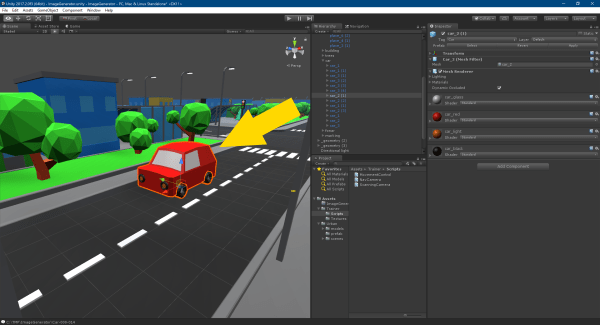
On the Unity project panel, go to the “Urban/prefab” folder and select the “car_1”, “car_2”, “car_3” prefabs. Change the gameObject tag to “Car”.
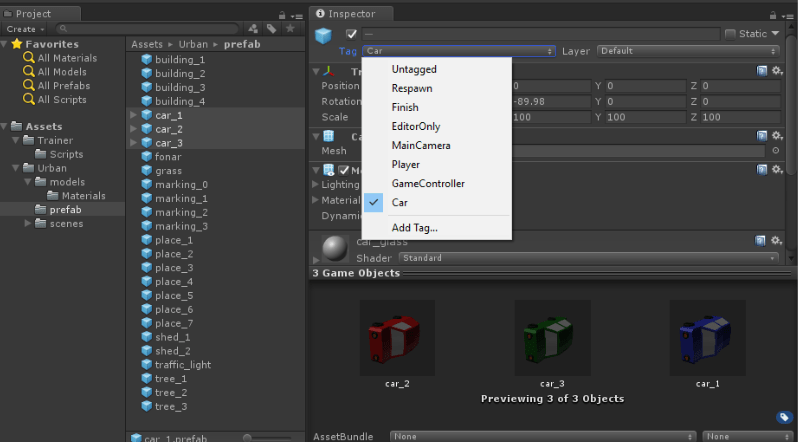
This tag is used by the camera script to identify and locate the car objects in the scene.
void Start()
{
    CarList = GameObject.FindGameObjectsWithTag("Car");
    carCount = MaxCars < 0 ? CarList.Length : MaxCars;
}
On the Unity hierarchy panel, expand the “_geometry” and similar “_geometry (n)” parent game objects, then open the “Car” entry to see the list of cars in the object. Verify that each “Car” object has a “Car” tag, otherwise shift-click to select all cars and apply the “Car” tag.

Select the camera object and review the script settings.
- Is Generate Images = checked
- Save Filepath =
- Delay Timer =
- Max Cars =

Select the “Game” Panel and ensure the output is set to 1920×1080 pixels. The script is using the simple screen snapshot ScreenCapture.CaptureScreenshot() from the Camera and will create a snapshot matching the Game panel size.

Ensure the “Save Filepath” folder exists on the workstation, and click “Play” on Unity to start generating training images. The resulting images will be prefixed by “Car-“ or “NoCar-“
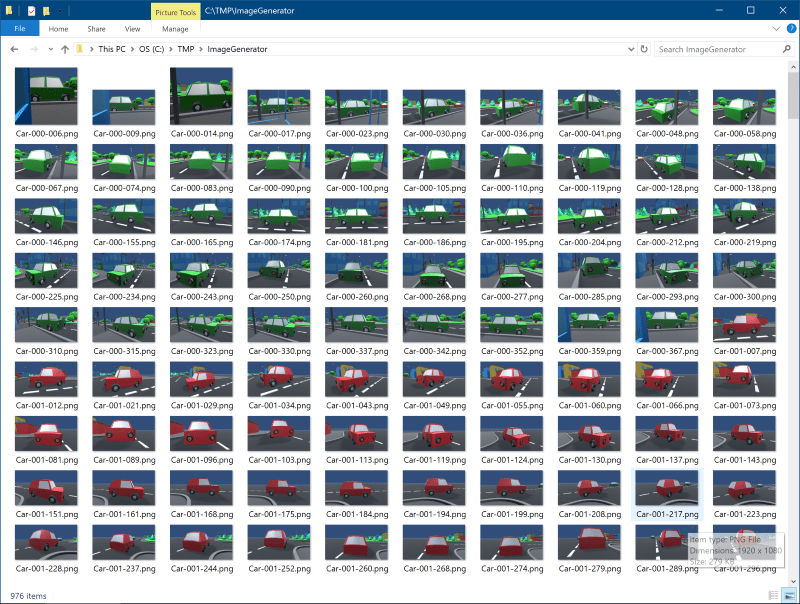
Create 2 folders, “Car” and “NoCar”, and move the “Car” and “NoCar” images into their respective folders. These images are now the classifier training data for “Car” and “NoCar” labels.
Deploy an Azure NC-Series GPU Server
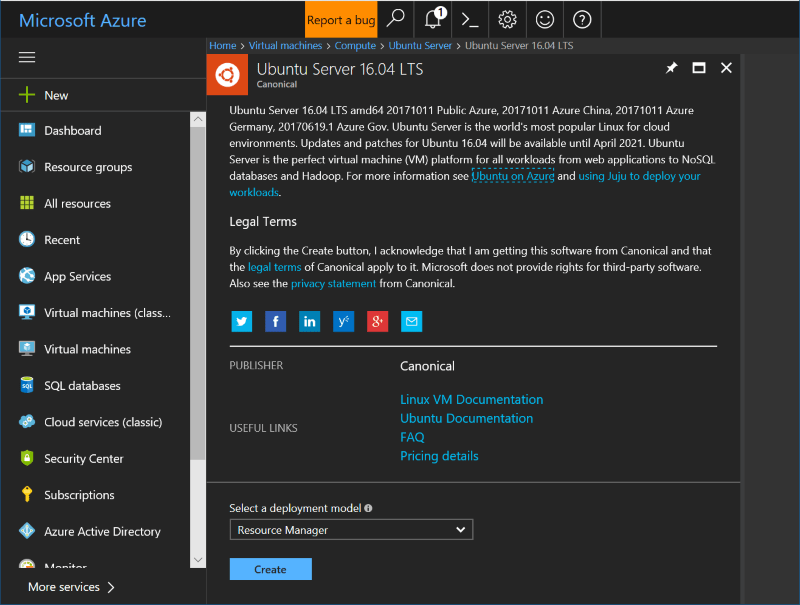
Log in to the Azure Management Portal. New users can gain access by signing up for Azure and will be given a free $150 credit to try out services and features. Note that NC-series virtual machine operating costs are a bit higher compared to other services, and the credit can be consumed quickly.
Select an NC-series GPU server with the Ubuntu 16.04 LTS Azure Marketplace template, and make sure it is accessible via SSH (using clients such as Putty or BitVise).
Remember to stop the server when not in use to avoid continued charges.
Configuring an NC-Series Server for NVIDIA DIGITS
Install NVIDIA drivers on the Ubuntu 16.04 Server via PPA to access the GPU. Execute the following commands on the server:
sudo add-apt-repository ppa:graphics-drivers/ppa -y
sudo apt update -y
sudo apt upgrade -y
sudo apt-get install nvidia-384 nvidia-modprobe -y
Install Docker on the server; NVIDIA DIGITS 6 executes in a Docker container. The following commands are based on the installation instructions for Docker CE. The last command verifies the installation with the execution of a rudimentary “Hello, World” sample.
sudo apt-get update -y
sudo apt-get install \
apt-transport-https \
ca-certificates \
curl \
software-properties-commoncurl -fsSL https://download.docker.com/linux/ubuntu/gpg | sudo apt-key add -
sudo add-apt-repository \
"deb [arch=amd64] https://download.docker.com/linux/ubuntu \
$(lsb_release -cs) \
stable"

sudo apt-get update -y
apt-cache madison docker-ce -y
sudo apt-get install docker-ce -y
sudo docker run hello-world
Continue with the Docker post-installation commands to enable a non-root Docker user, and enable the Docker service to start on boot.
sudo groupadd docker

sudo usermod -aG docker $USER

sudo systemctl enable docker
Reboot the server and verify the execution of the “hello-world” sample, without root privileges.
docker run hello-world
Install NVIDIA-DOCKER:
wget -P /tmp https://github.com/NVIDIA/nvidia-docker/releases/download/v1.0.1/nvidia-docker_1.0.1-1_amd64.debsudo dpkg -i /tmp/nvidia-docker*.deb && rm /tmp/nvidia-docker*.deb
Verify the installation by executing the NVIDIA System Management Interface:
nvidia-docker run --rm nvidia/cuda nvidia-smi
Install NVIDIA DIGITS. Use the /mnt temporary work disk partition on the Azure VM:
nvidia-docker run --name digits -d -p 5000:5000 --restart=always -v /mnt/data/digits/train:/data/train -v /mnt/data/digits/jobs:/jobs nvidia/digits
SFTP the generated training files from the Unity workstation environment to the server running NVIDIA DIGITS. Create a “train” folder in the user’s home directory and upload the “Car” and “NoCar” folders of images into this “train” directory.

Prepare the /mnt work disk and copy the training files from ~/train/Car and ~/train/NoCar folders:
sudo mkdir /mnt/datasudo mkdir /mnt/data/digits
sudo mkdir /mnt/data/digits/jobs
sudo mkdir /mnt/data/digits/train
cp -r ~/train/* /mnt/data/digits/train
Creating a Classifier Model
Enable SSH forwarding via port 5000 on the SSH client connected to the Azure GPU server.
Use the local workstation’s web browser to access the DIGITS site (via the forwarded port) at http://localhost:5000
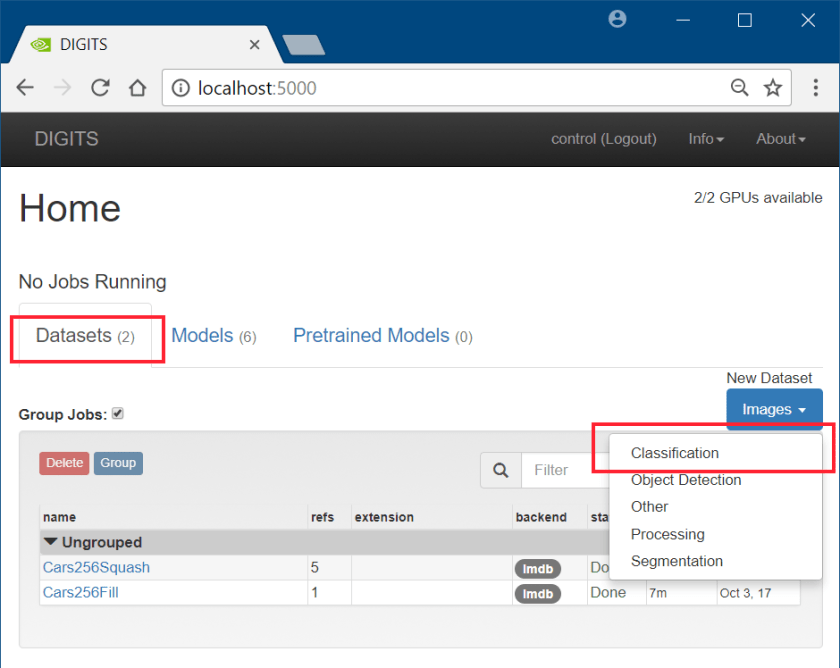
Set Up an Image Classification Dataset
- Select the “Dataset”
- Click the “Images” Button (under “New Dataset”) and select “Classification“
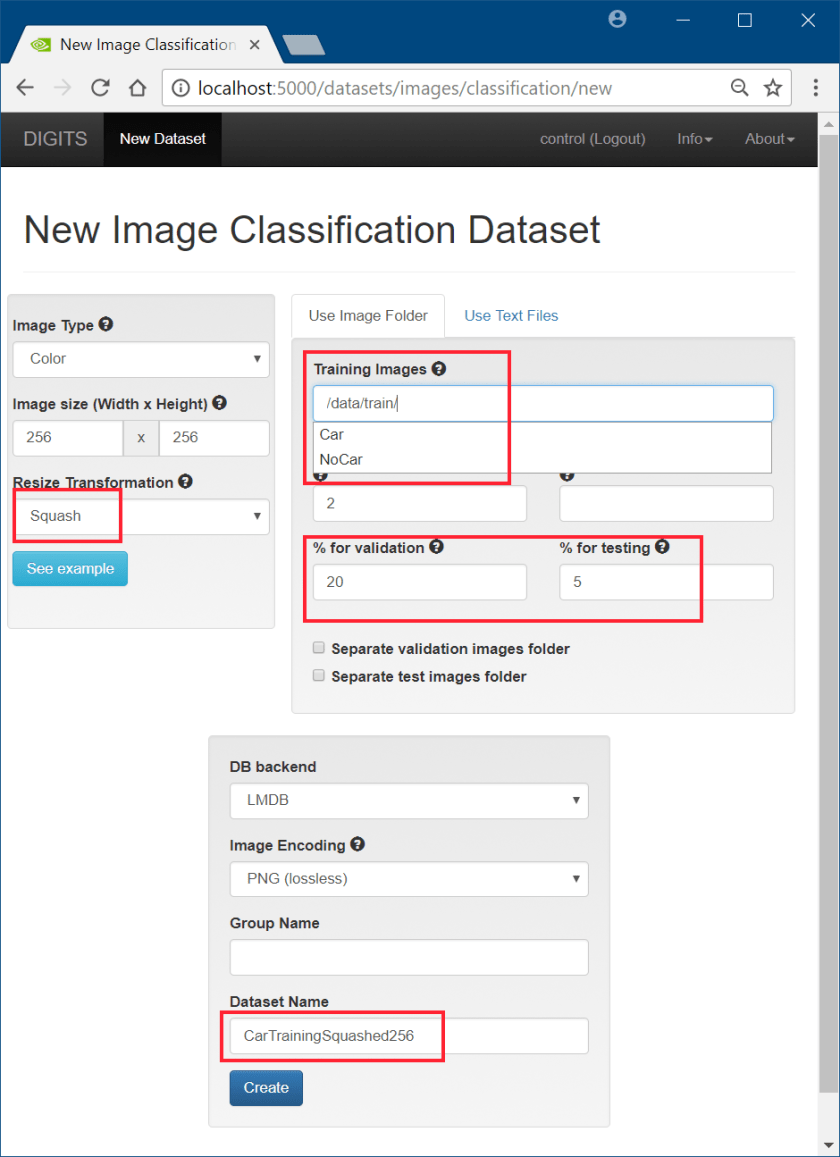
Configure the Classification Dataset
- The images will be resized to match the default models on DIGITS (256×256)
- The training image folder is mapped to /data/train on the DIGITS container
- Set Validation and Testing sets 20% and 5% respectively
- Set the Dataset name to “CarTrainingSquashed256” or similar
- Click “Create” to create the Dataset
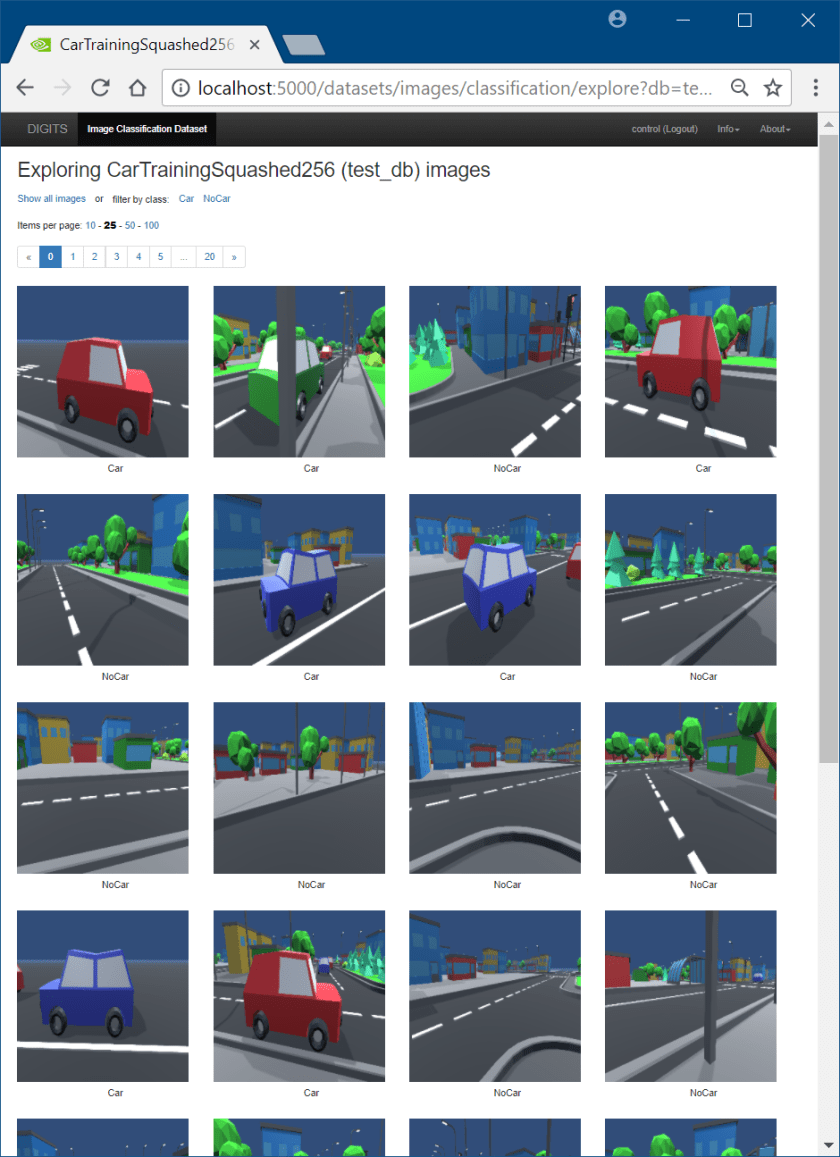
Viewing the Dataset
- The Dataset is composed of training, validation, and test sets.
- Open the “test” set to view its contents by clicking on the “Explore the db” button.
- Download one each of “Car” and “NoCar” sample PNG’s for testing

Training Classifier Model
- Select the “Models” tab
- Click the “Images” button and select “Classification“

- Select the previously generated training dataset “CarTrainingSquashed256”
- Set Training Epochs = 5; training is relatively quick with the virtual, non-photorealistic, training data
- Set the Learning Rate to 0.001
- On the Standard Networks, Select TensorFlow and AlexNet
- Set the model name to “CarsTrainingTF-AlexNet-1” or similar
- Click “Create” to start the training

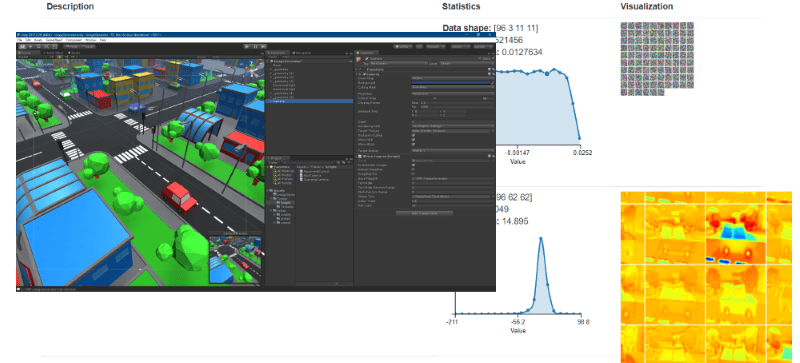
Testing the Trained Model
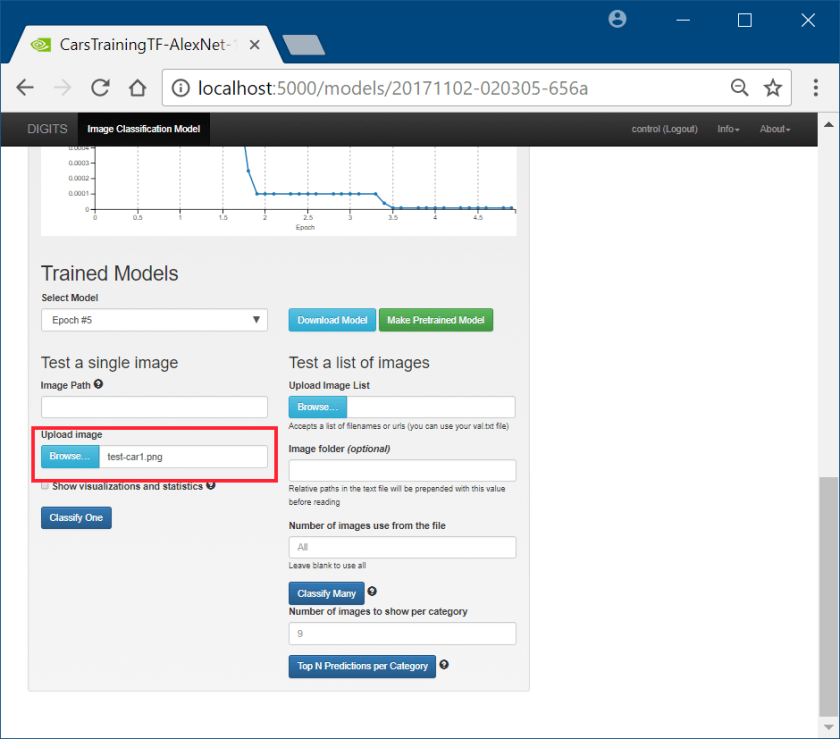
- On the lower section of the Model page, submit a test image for evaluation
- Click the “Browse” button and locate the test car image
- Click “Classify One”


The classifier can distinguish between a “Car and “NoCar” image to validate the training data and GPU server’s setup.
Conclusion
We have now successfully taken the early steps in building an autonomous control system. The next stage of development would involve setting up distributed TensorFlow servers, converting the trained model from TensorFlow to TensorRT, and using the model on an edge compute device (such as the NVIDIA Jetson TX series, or the NVIDIA DrivePX) connected to our virtual environment as part of our end-to-end setup.
Additional posts about this project will discuss how to setup the Jetson TX with the trained classifier model to simulate a car object detector with input being fed from the virtual world.
For questions, comments or contact – follow/message me on Twitter @rlozada

You must be logged in to post a comment.